Feature Comparison and Location
This topic compares the features available in the standalone GUI and the Visual Studio extension package. It provides information on where to find the comparable feature in Visual Studio as well as notes on differences between the two.
User Preferences
User preferences related to general options that are not tied to any specific project can be found in the Visual Studio options dialog box. Select Tools | Options from the main menu bar and then select the Sandcastle Help File Builder category. The available user preferences differ slightly between the standalone GUI and Visual Studio. For a more detailed description of the available preference options, see the User Preferences topic.
Creating a New Project
To create a new help file builder project within Visual Studio, do the following:
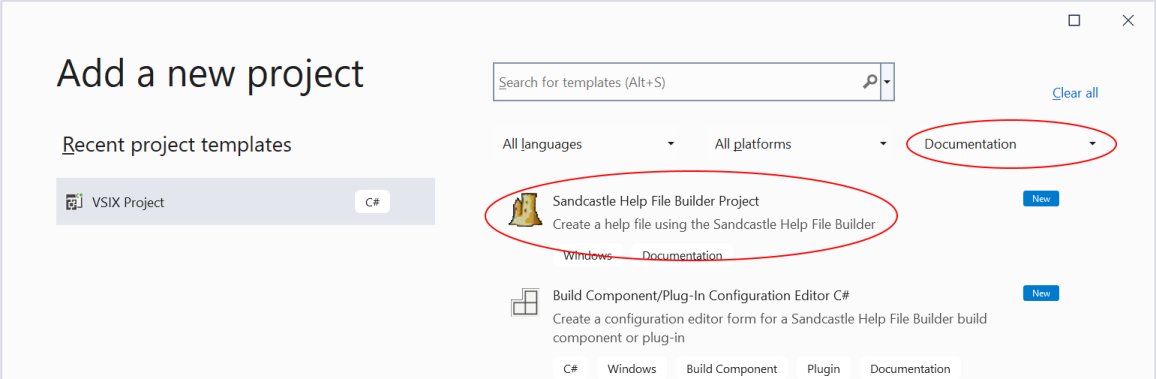
Select File | New | Project from the main menu bar.
In the New Project dialog, select the Documentation sub-category. If you cannot see the help file build project template, ensure that you have selected the "All Languages" and "All Platforms" options as well rather than a specific language or platform.
Select the Sandcastle Help File Builder Project template to create a new, blank project. Enter a new project name, the folder in which to place it, and any other options, and then click the Create button to create it.
Project Management
The Visual Studio shell takes the place of the standalone GUI for all project management related tasks such as creating projects, adding and removing files to them, and building them. There are many additional benefits to using Visual Studio for help file builder projects such as:
Help file projects are part of a Visual Studio solution file and can be combined and built along with other project types such as the assembly projects that they are documenting. As such, there is no longer a need to build the help file project using the post-build event of another project. You can also combine multiple help file projects into a single solution file.
The Solution Explorer tool window supports multiple selection and you can perform operations on more than one file at once.
With the projects hosted in Visual Studio, you gain access to source control and can manage help file builder projects under source control much more easily.
Visual Studio provides better editors for all of the common file types. In addition, you gain access to extra features when editing files such as IntelliSense. The package installs schemas for Microsoft Assistance Markup Language (MAML) topic files to make editing them easier.
Additional add-ins and extensions can be installed to provide new features such as spell checking, etc.
The equivalent project management features and commands from the standalone GUI should be quite easy to find within Visual Studio. Opening existing projects, managing files within a project, building a project, and cleaning the project output, is done the same way as for any other type of Visual Studio project. The Solution Explorer tool window in Visual Studio corresponds to the Project Explorer tool window in the standalone GUI and provides all of the same options with regard to adding and removing documentation sources, references, and other supporting files. Properties for project items are edited via the Properties tool window in Visual Studio. An additional Project Properties node appears in the Visual Studio solution explorer that lets you open the project property editor window. You can also get to it by right clicking on the project node and selecting the Properties context menu option. The Open Project in Standalone GUI option on the project node's context menu will allow you to open the selected project in the standalone GUI. The View Build Log Content option on the context menu will allow you to open the Build Log Content tool window. It displays the full content of the build log from the last time the help file project was built.
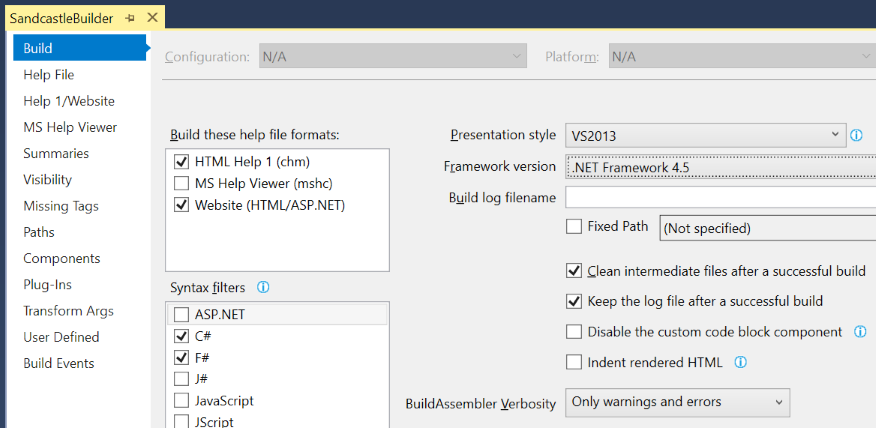
Editing a Project's Properties
The project properties can be accessed by selecting the Properties context menu option on the project node or by double-clicking the Project Properties node in the Solution Explorer tool window. The project properties editor window in Visual Studio is almost identical to the one in the standalone GUI. Properties are grouped into categories sorted by frequency of usage rather than alphabetically. On each property page, an information and/or warning tip icon appears after some properties. Hover the mouse over the icon to see additional usage notes or warnings related to the property.
Menu Option and Toolbar Locations
A toolbar is available for help file builder projects. On it, you will find the options to open the various help file formats, open the MS Help Viewer library manager tool, open the build log content tool window, open the FAQ help topic, and open the help file builder's help file. The help file viewing options are also available from the View | View Help File submenu. To show or hide the help file builder toolbar, either select the View | Toolbars | Sandcastle Help File Builder menu option or right click in the toolbar area and select the Sandcastle Help File Builder context menu option.
The Entity References tool window and Topic Previewer window can be opened by selecting their menu option on the View | Other Windows menu or from the Other Windows toolbar button dropdown. The build log tool window can be opened by selecting Build | View Build Log Content or from the help file builder's toolbar dropdown button.
Source Control Tips
As noted above, using Visual Studio to manage help file builder projects provides access to the built-in source control providers within it. When making changes to a project or file within Visual Studio, source control operations will occur as they normally do for any other project type. If you edit a help file builder project or its related files with both Visual Studio and the standalone GUI keep the following in mind:
Files can be added and removed from the project while it is open in both Visual Studio and the standalone GUI. Both will prompt you to reload the project if they detect that it has been modified outside of their respective environment.
The standalone GUI does not support source control. As such, you must check the files out in Visual Studio prior to saving any changes made to them in the standalone GUI. It is best to check files out prior to modifying them in the standalone GUI so that you can ensure that you have a current version of the file if necessary.
If you need to rename a file, it is recommended that you do it from within Visual Studio rather than the standalone GUI so that the source control provider makes a note of the rename operation. Such changes made to a source controlled file in the standalone GUI may cause problems with keeping the file in synch with the source control store.
Files can be safely added to a source controlled project from the standalone GUI. However, when you load the project or refresh it in Visual Studio, the new files will not automatically be added to source control. To remedy this situation, do the following from within Visual Studio:
Make sure the project node or one of its files is selected and use the Project | Show All Files option to show all files within the project folder including those that are not part of the project.
Select each of the files that was added via the standalone GUI.
Right click on one of the selected files and select the Exclude From Project context menu option. This will exclude the files from the project. Because the Show All Files option is enabled, they will still appear as items in the solution explorer but with an icon that indicates their excluded state.
With the same set of files selected, right click on one of them again and select the Include In Project context menu option. The files will be added to the project again and the source control provider will automatically add them to the source control store. Once done, the icons next to the files will change to show that they are once again part of the project and that they have been added to source control. Note that you may need to adjust the file's properties after adding them back to the project (i.e. files that have an Image build action).