Site Map File Editor
Adding a site map file to the project and setting its BuildAction to SiteMap allows you to define the table of contents layout for the additional content markdown and HTML files. The layout in the site map file can differ from the physical folder structure of the content files.
The Site Map Editor Window
The structure of the site map file is the same as that used for ASP.NET web sites but it only makes use of the title and url attributes on the siteMapNode elements. In addition, it adds a custom isDefault attribute to the default topic element, a custom splitTOC attribute to the topic where the table of contents should be split with API topics appearing below it, and custom isExpanded and isSelected attributes to track the expanded/ collapsed and last used topic states for the editor. For more information on the structure of site map files, see the ASP.NET Site Maps help topic. You can edit the site map file from within the help file builder by double-clicking it in the Project Explorer window or by selecting the Open option from its context menu. The site map editor window is shown below.
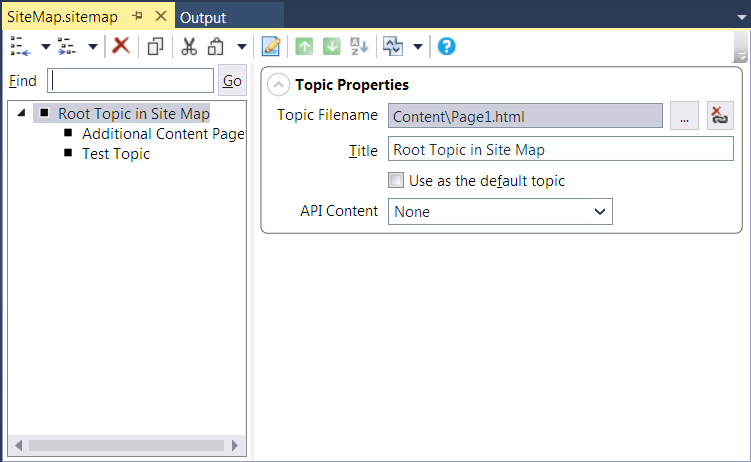
The left side of the window shows the table of contents as it is currently defined. Entries can be arranged hierarchically to any number of levels. The right side of the window shows the properties for the currently selected entry. You can modify the topic's details at any time. Changes are stored automatically before moving off to another topic in the tree. Files defined in the site map do not have to appear as additional content items in the project. Any files in the site map that are not found in the defined additional content items at build time are copied over to the root output folder automatically.
The Find textbox allows you to search for a topic by filename or display name. Enter some text to find and hit Enter or click the Go button to start the search. Hit Enter or click Go again to find subsequent matches. Matches are found by doing a case-insensitive search of the topic filename and display names.
The tree supports drag and drop to re-order the topics. Simply click and hold the left mouse button on a topic and then drag it to its new location. When you drop it on a topic, it is inserted immediately after the target item. If you hold down the Shift key while dropping an item, it will become a child of the target item.
Available Options and Commands
The options that can be modified for a topic appear on the right side of the window and are as follows:
- Topic Filename
This read-only property displays the project file related to the site map entry. The two buttons to the right of the currently associated topic filename let you do the following:
Associate Topic - This button allows you to associate a different topic file with a site map file entry or add an association to an empty container node.
Clear Topic Association - This button allows you to clear the topic file associated with a site map file entry converting it into an empty container node. The node will not have a topic associated with it in the compiled help file nor will it display a topic when selected in the table of contents. It simply serves as a container for other topics and must have at least one child topic defined for it.
- Title
This is used as the title for empty container nodes. For nodes with a file, the title is extracted from the topic file at build time. It can be set for informational purposes while editing the site map file.
- Use as the default topic
This will mark the selected topic as the default topic for the help file. The default topic option acts as a toggle. Check it on a topic to set it as the default. If another topic was previously marked as the default topic, the option is removed from it. Unchecking it on the same topic turns it off and no topic will be selected as the default topic. In such cases, the root namespaces page will be the default topic for the help file. When set, a green circle icon with a check mark appears next to the topic in the content layout tree to indicate its status.
- API Content
This is used to indicate how the API (reference) content for the help file should be inserted relative to the selected topic. The following options are available:
None - This topic will not be used as the API content insertion point.
Insert after this topic - The API content will be inserted immediately after this topic in the table of contents.
This option acts as a toggle. Select a value other than None to make it the API content insertion point. If another topic was previously marked as the API content insertion point, the option is removed from it. An icon will appear next to the topic in the content layout tree to indicate its API content insertion point state. This option can be combined with the default topic option. If no topic is set as the API content insertion point, the API content will be added to the table of contents following the standard content placement rules.
The tool bar above the tree is used to perform various actions on the site map file such as adding new topics, deleting topics, rearranging them, etc. These options are also available in a context menu accessed by right clicking on a topic in the tree. The commands (from left to right) and their associated context menu options perform the following actions:
- Add Sibling Topic
This will add a new topic at the same level as the currently selected topic. The sub-options for this command allow you to add a new topic file based on a template, add an existing topic file, add all topic files from an existing folder, or add an empty container node.
- Add Child Topic
This will add a new topic as a child of the currently selected topic. The sub-options for this command allow you to add a new topic file from a template, add an existing topic file, add all topic files from an existing folder, or add an empty container node. The notes from above for sibling topics apply to these commands as well.
- Delete
Delete the selected topic and all of its sub-topics.
- Copy as Topic Link
Copy a link to the topic to the clipboard. If pasted into an HTML file, an anchor link element is inserted that will link to the selected topic.
- Cut
Cut the selected topic and its sub-topics to the clipboard. A copy of the topic is made and it is then removed from the tree.
- Paste
If a topic has been cut to the clipboard, you can click the Paste button to add it to the tree. If you just click the button, the topic is added as a sibling of the currently selected topic immediately following it. If you select the Paste as Child sub-option, the topic is inserted as a child of the selected topic.
- Edit File
Edit the selected content file. Double-clicking a topic in the tree will also open it for editing.
- Move Up
This will move the selected topic up in the order of topics at the same level as the selected topic. Note that moving a topic will also move its sub-topics. Sub-topics will still remain in their given order below the parent topic.
- Move Down
This will move the selected topic down in the order of topics at the same level as the selected topic. Note that moving a topic will also move its sub-topics. Sub-topics will still remain in their given order below the parent topic.
- Sort Topics
Sort the topics alphabetically by title within the currently selected topic's group.
- Expand/Collapse Options
This command contains a set of options that lets you expand or collapse all topics in the tree or just the sub-topics for the selected topic. When the file is saved, the expanded/collapsed state is saved along with the last selected topic making it easy to return to the spot you stopped editing the file when it was last opened. This information is also used by the Entity References Window to make it easy to find the current topic when using it to insert topic references into other topic files.
- Help
Open this help topic in the help file.
Keyboard Shortcuts
The following keyboard shortcuts can also be used in the content tree to execute the various commands:
Context Menu Key - Display the context menu.
Delete - Delete the selected topic.
Ctrl+Up - Move the selected topic up within its group.
Ctrl+Down - Move the selected topic down within its group.
Ctrl+C - Copy a link to the selected topic to the clipboard. Performing a paste operation in a text editor window will insert an anchor link to the copied topic.
Ctrl+X or Shift+Delete - Cut the selected topic to the clipboard.
Ctrl+V or Shift+Insert - Paste the topic on the clipboard as a sibling of the selected topic.
Ctrl+Shift+V or Ctrl+Shift+Insert - Paste the topic on the clipboard as a child of the selected topic.
Ctrl+E - Edit the selected topic.
Ctrl+Shift+T - Sort the topics at the same level as the selected topic alphabetically.