DataList Control Tutorial
This topic describes the Data List control and its features.
General Information
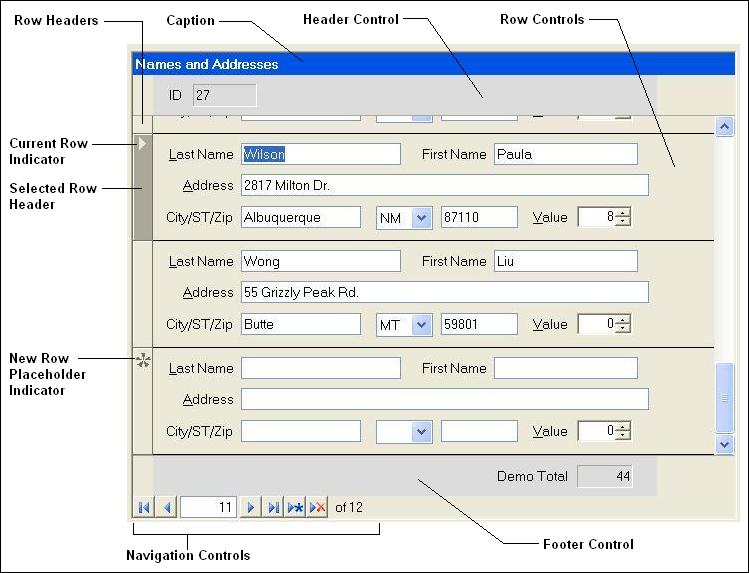
The DataList control allows you to specify a user control template that is used to display and edit information from a data source similar in nature to the DataList web server control, the subform control or continuous forms detail section in a Microsoft Access form, or the DataRepeater control from Visual Basic 6. Figure 1 below identifies the common elements of the data list control as seen at runtime.
To use the DataList control, simply drag the control from the toolbox, drop it on the form, and use the Properties window to adjust its settings.
The properties in the Appearance category allow you to hide the row headers or adjust their width and color, hide all of the navigation controls or just the Add and Delete buttons, hide the separator between rows or adjusted its size and color, etc.
The properties in the Behavior category can be used to specify whether or not additions, edits, or deletions are allowed to the data source, the shortcut keys to use for deleting a row, moving to the new row, jumping to the row number navigation text box, or switching between sections, and setting the repeat speed for the Next and Previous navigation buttons.
The control supports the same complex data sources that any other standard .NET control can use (i.e. data sets, data views, data tables, arrays, etc). To assign a data source and edit its contents, you must set the RowTemplate and the DataSource properties. You may also need to set the DataMember property if the source contains multiple items to which the data list can bind (i.e. a DataSet). If you assign these properties in code, always assign the DataSource property last to improve performance. This is true of all .NET controls as assigning a new display or value member forces the control to reevaluate its data source. By assigning the data source last, it will only have to evaluate the data source once. The RowTemplate property defines the template to use for the rows in the data source. This property cannot be set at design-time and is specified using code instead. The optional HeaderTemplate and FooterTemplate properties used to define the header and footer controls are also set using code.
Each row in the data list will have its own binding context. As such, it is possible to share a data source for combo box controls, etc across all row templates and still allow each row to select unique values from it. The header and footer templates inherit the data list's binding context so that they can stay in synch with its data source as you move from row to row.
Unlike the standard .NET list controls, all of the controls in the EWSoftware.ListControls namespace allow you to index their data source to extract values. This allows you to obtain the value of a field in the currently selected row or a field in any row even if it is not the selected row and regardless of whether or not the field is displayed in the template.
// Get the last name from the current row
string lastName = (string)dlPeople["LastName"];

// Get the age from the sixth row
int age = (int)dlPeople[5, "Age"];' Get the last name from the current row
Dim lastName As String = CType(dlPeople("LastName"), String)
' Get the age from the sixth row
Dim age As Integer = CType(dlPeople(5, "Age"), Integer)Creating Header, Footer, and Row Templates
The header, footer, and row template controls used by the DataList are all derived from the supplied TemplateControl class. The process for creating them is almost identical for all three types but there are some differences in how they are utilized. Row templates are initialized and bound as they are scrolled into view. One row template is created for each row in the data source. As such, you are free to have per-row settings and formatting such as color coding the rows or controls based on the values in the row etc. Header and footer templates are created and initialized immediately when a data source is specified. They are also bound to the data source as a whole. As you move through the data source, any bound controls in the header and footer will update to reflect the values in the row selected in the details section of the data list.
There is no way to create and design header, detail, and footer templates together as part of the DataList control on a form at design-time. Instead, each template is created and edited as a separate user control within Visual Studio just like any other user control. The template type is then assigned to a property on the data list using code. To create a new template control, follow these steps:
Right click on the project in the Solution Explorer, select Add, Add User Control, enter a name for the new user control, and click Open to add it to the project.
Open the new user control in the designer and view the code for it.
Change the base class of the user control to EWSoftware.ListControls.TemplateControl.
C#public class AddressRow : EWSoftware.ListControls.TemplateControlVB.NETPublic Class AddressRow Inherits EWSoftware.ListControls.TemplateControlFor a row template, it is strongly suggested that you use the deferred initialization technique described next. Row templates are bound and initialized as they are scrolled into view. By deferring initialization, the data list loads much faster when first displayed and will not consume resources until needed when viewing large data sets. Header and footer templates are always initialized as soon as they are created so there is no need to use this technique for them. The first step in deferring initialization is to modify the constructor to suppress the call to the InitializeComponent method unless it is made at design-time. This is done by using an if statement as shown here:
C#public AddressRow() { // This call is required by the Windows.Forms Form Designer. // At runtime, actual initialization is deferred until needed. if(this.DesignMode) InitializeComponent(); }VB.NETPublic Sub New() ' This call is required by the Windows.Forms Form Designer. ' At runtime, actual initialization is deferred until needed. If Me.DesignMode = True Then InitializeComponent() End If End SubThe last step is to add an override for the InitializeTemplate method. This is when InitializeComponent is called to actually create the controls contained in the template. This override can also be used to set the data sources on combo boxes, list boxes, etc, and to check the data list's change policy to see if controls need to be disabled, etc. The base implementation does nothing so there is no need to call it.
C#// Actual initialization is deferred until needed to save // time and resources. public override void InitializeTemplate() { // Create the contained controls this.InitializeComponent(); // Use the shared data source for the combo box cboState.DisplayMember = cboState.ValueMember = "State"; cboState.DataSource = (DataView)this.TemplateParent.SharedDataSources["States"]; // Update control states based on the parent's change policy. // This can be omitted if you do not need it. this.ChangePolicyModified(); }VB.NET' Actual initialization is deferred until needed to save ' time and resources. Public Overrides Sub InitializeTemplate() ' Create the contained controls Me.InitializeComponent() ' Use the shared data source for the combo box cboState.DisplayMember = "State" cboState.ValueMember = "State" cboState.DataSource = CType(Me.TemplateParent.SharedDataSources("States"), DataView) ' Update control states based on the parent's change policy. ' This can be omitted if you do not need it. Me.ChangePolicyModified() End SubAdd controls to the template and any required event handlers for them as you would for any other user control. You can also define public properties and methods if necessary to let forms containing the data list utilizing the template make changes to it, etc.
Normal Label controls do not respond to mouse clicks. As such, clicking on a label in a row will not give the row the focus. Clicking on any other control type will give it the focus. If you would like to be able to click on labels to select a row, use the supplied ClickableLabel control. It is identical to the standard label control but when clicked with the mouse, it will give the focus to the first tab-stop-enabled control following it in the tab order. If the control is disabled or one is not found, it simply gives the parent row template the focus instead. The ClickableLabel can be used on normal forms and user controls as well.
View the code for the user control and add an override for the Bind method. This is a required override so you must add it even if you have no bound controls (a header or footer might not have any). In such cases, override it and leave the method body empty. Do not call the base implementation of Bind as it does nothing but throw an exception reminding you to override it.
In the Bind method, you will add code to clear and then create the data bindings for controls that you will use to edit information in the template's row source. Templates may get re-bound under may different circumstances. As such, the DataBindings collection on all bound controls must be cleared before you add the new bindings. If you do not, it will generate a runtime exception that complains about duplicate bindings. To simplify this process, it is suggested that you use the template control's overloaded AddBinding method as shown in the example below. This greatly reduces the amount of code you have to write in order to clear and recreate the bindings.
C#// Bind the controls to their data source public override void Bind() { this.AddBinding(txtFName, "Text", "FirstName"); this.AddBinding(txtLName, "Text", "LastName"); this.AddBinding(txtAddress, "Text", "Address"); this.AddBinding(txtCity, "Text", "City"); this.AddBinding(cboState, "SelectedValue", "State"); this.AddBinding(txtZip, "Text", "Zip"); this.AddBinding(udcSumValue, "Text", "SumValue"); }VB.NET' Bind the controls to their data source Public Overrides Sub Bind() Me.AddBinding(txtFName, "Text", "FirstName") Me.AddBinding(txtLName, "Text", "LastName") Me.AddBinding(txtAddress, "Text", "Address") Me.AddBinding(txtCity, "Text", "City") Me.AddBinding(cboState, "SelectedValue", "State") Me.AddBinding(txtZip, "Text", "Zip") Me.AddBinding(udcSumValue, "Text", "SumValue") End SubAs mentioned, AddBinding is overloaded. The example above uses the version that clears all existing bindings and adds the requested binding. Other versions will let you add additional bindings to a control without clearing the current bindings and also specify optional Format and Parse event handlers for the bindings.
If the template will be used in a data list that can have a variable change policy (i.e. it might allow edits or it might not), you may need to override the ChangePolicyModified method to update the state of controls in the template based on the new policy. This method is called by the data list on rows that have been initialized and bound whenever its change policy is modified after the data source has been specified. Note that you may also need to call this method from the InitializeTemplate method to set the state of controls when a row is initialized after being scrolled into view or when the data source changes. The base implementation does nothing so there is no need to call it.
C#// Enable or disable the controls based on the edit policy. public override void ChangePolicyModified() { if(this.TemplateParent.AllowEdits != txtFName.Enabled && !this.IsNewRow) { txtFName.Enabled = txtLName.Enabled = txtAddress.Enabled = txtCity.Enabled = cboState.Enabled = txtZip.Enabled = this.TemplateParent.AllowEdits; } }VB.NET' Enable or disable the controls based on the edit policy. Public Overrides Sub ChangePolicyModified() Dim allowEdits As Me.TemplateParent.AllowEdits If allowEdits <> txtFName.Enabled And Me.IsNewRow = False Then txtFName.Enabled = allowEdits txtLName.Enabled = allowEdits txtAddress.Enabled = allowEdits txtCity.Enabled = allowEdits cboState.Enabled = allowEdits txtZip.Enabled = allowEdits End If End SubIf rows can be deleted from the data source, you can override the template's CanDelete property to allow it to permit or deny the deletion based on conditions that you set such as getting a confirmation from the user. The row being deleted is always given the first chance to deny the deletion. If the row allows it, the data list raises its DeletingRow event to let the containing form have a chance to permit or deny the deletion.
There are advantages to putting delete confirmations within the template. It has direct access to its controls so it is easier to perform any necessary validation prior to allowing the deletion. If the template is used in many forms, it also saves you from having to add an event handler for the data list's DeletingRow event in each one.
If you need validation in your row template, add an event handler for the template's Validating event. By performing all of your validation in this event, you ensure that the row cannot be left if it is in an invalid state. The data list will raise this event on the current row template whenever it is needed. The demo application contains an example.
Using the Templates
Once the templates have been created, you can assign their type to the appropriate property on the DataList control as shown below. This is usually done in the form's constructor or when the data source is assigned to the data list. You can assign the templates to the properties individually or in conjunction with the data source using the SetDataBinding method.
// Set the properties individually
dlAddresses.RowTemplate = typeof(AddressRow);
dlAddresses.HeaderTemplate = typeof(AddressHeader);
dlAddresses.FooterTemplate = typeof(AddressFooter);
dlAddresses.DataMember = "Addresses";
dlAddresses.DataSource = dsAddresses;

// Set the row template with the data source
dlAddresses.SetDataBinding(dsAddresses, "Addresses", typeof(AddressRow));

// Set all three templates along with the data source
dlAddresses.SetDataBinding(dsAddresses, "Addresses", typeof(AddressRow),
    typeof(AddressHeader), typeof(AddressFooter));

// This example specifies the table without going through the data set
dlAddresses.SetDataBinding(dsAddresses.Tables[0], null, typeof(AddressRow));' Set the template types individually
dlAddresses.RowTemplate = GetType(AddressRow)
dlAddresses.HeaderTemplate = GetType(AddressHeader)
dlAddresses.FooterTemplate = GetType(AddressFooter)
dlAddresses.DataMember = "Addresses"
dlAddresses.DataSource = dsAddresses
' Set the row template with the data source
dlAddresses.SetDataBinding(dsAddresses, "Addresses", GetType(AddressRow))
' Set all three templates along with the data source
dlAddresses.SetDataBinding(dsAddresses, "Addresses", GetType(AddressRow),
GetType(AddressHeader), GetType(AddressFooter))
' This example specifies the table without going through the data set
dlAddresses.SetDataBinding(dsAddresses.Tables(0), Nothing, GetType(AddressRow))Once the data source and row template are assigned, you can use the data list to edit information in the data source. Before you save changes to the data source, it is important to call the CommitChanges method on the data list control so that it can commit any pending changes (i.e. data in the form controls that has not yet been pushed into the data source). You can also check the HasChanges property to see if any changes were made. Using the HasChanges property automatically commits any pending changes.
private void btnSave_Click(object sender, System.EventArgs e)
{
    // We must commit any pending changes
    dlList.CommitChanges();

    daAddresses.Update(dsAddresses);
}Private Sub btnSave_Click(sender As Object, e As System.EventArgs)
' We must commit any pending changes
dlList.CommitChanges()
daAddresses.Update(dsAddresses)
End SubThe Data List's Change Policy
The DataList control has three properties that allow you to specify whether additions, edits, or deletes are allowed to be made to the data source (AllowAdditions, AllowEdits, and AllowDeletes). All three properties default to true. However, when a data source is assigned to the data list, these properties may be updated to reflect the change policy of the data source. For example, if the data source does not allow additions, the AllowAdditions property will also be set to false. Likewise, you can set the properties to false to disallow the associated modification even if the underlying data source allows it.
The data list will automatically adjust its behavior when additions are not allowed by hiding the new row placeholder and disabling the Add button in the navigation controls. When deletions are not allowed, it disables the Delete button in the navigation controls. The shortcut keys for both operations are also ignored when their associated behavior is not allowed. The data list and the template controls cannot handle the AllowEdits setting by themselves. It is up to you to add code to your templates to check the change policy as needed and disable the controls if edits are not allowed. The demo application contains an example of this. As shown in the demo, it is possible to disable edits but still allow additions. In this situation, new rows can be added and edited but any existing rows are read-only.
The data list also raises a NoRows event when a data source is assigned that contains no rows or when the last row is deleted. You can use this event to disable edit controls in the header and footer until a new row is added and/or display a message asking the user to add a new row.
Shared Control Data Sources in Templates
When a template contains other controls with data sources such as combo boxes, list boxes, etc, it can be expensive to create and load the data source for each control in every row template. However, each template has its own binding context so it is much more efficient to share a common data source amongst all templates for those controls. Because of its unique binding context, the controls in each row can be set independently of each other without any conflicts while sharing a common data source. To implement a shared data source for the controls in a template, follow these steps.
In forms that contain a data list that utilizes the template, create and store the data source in the data list's SharedDataSources property. This is a simple hash table that is used to store shared data sources for templates by key name. For example:
C#public DataListTestForm() { // ... Other constructor code ... // Load the state codes for the row template's shared data source OleDbDataAdapter daStates = new OleDbDataAdapter( "Select State, StateDesc From States", dbConn); DataTable dtStates = new DataTable(); daStates.Fill(dtStates); dlList.SharedDataSources.Add("States", dtStates.DefaultView); // ... Other constructor code ... }VB.NETPublic Sub New() ' ... Other constructor code ... ' Load the state codes for the row template's shared data source Dim daStates As New OleDbDataAdapter( "Select State, StateDesc From States", dbConn) Dim dtStates As New DataTable() daStates.Fill(dtStates) dlList.SharedDataSources.Add("States", dtStates.DefaultView) // ... Other constructor code ... End SubThis can be done in the form's constructor or at any point prior to assigning the template to the data list control. Always store the shared data source before assigning the template to the data list. This is especially true for header and footer templates as they are created and initialized when assigned and will not see the data source if you set it after assigning them to the data list.
In the InitializeTemplate override for the template, add code to set the data source on the controls that need it by retrieving the data source from the parent data list's SharedDataSources property using the appropriate key name. For example:
C#protected override void InitializeTemplate() { // Create the contained controls this.InitializeComponent(); // Use the shared data source for the combo box cboState.DisplayMember = cboState.ValueMember = "State"; cboState.DataSource = (DataView)this.TemplateParent.SharedDataSources["States"]; }VB.NETProtected Overrides Sub InitializeTemplate() ' Create the contained controls Me.InitializeComponent(); ' Use the shared data source for the combo box cboState.DisplayMember = "State" cboState.ValueMember = "State" cboState.DataSource = CType(Me.TemplateParent.SharedDataSources("States"), DataView) End Sub
Creating Calculated Fields and Footer Totals
Due to the way that data binding works in .NET, changes to a row are not committed to the data source unless you move off of the row or call the CommitChanges method. This may have an effect on calculated fields in the data source that are displayed in a row template. For example, if you have an item quantity, a cost, and a total value field that is computed from the prior two displayed on the template, changes made to the item quantity or cost will not affect the displayed total value until you move off of the row. If you always need to have the most current total displayed, you can add an event handler for the Leave event on the item quantity and cost controls and in it call the row template's CommitChanges method. This will cause the changes to get pushed into the data source and the total will reflect the new value. However, this does have the side effect that all other changes to the row are saved as well and they cannot be undone by hitting the Escape key. A more acceptable approach might be to not bind the total column and instead compute and display the total manually in the Leave event handlers.
It is also possible to display aggregate values from the data source. For example, you might want to display the sum of all values in a field from the data source in the data list's footer. For read-only data, this can be accomplished by overriding the footer template's Bind method and computing the value in it.
// Recalculate the footer total when bound
protected override void Bind()
{
    // Get the data source from the parent
    DataTable tbl = this.TemplateParent.DataSource as DataTable;

    // If not null, compute the sum of the item quantity
    if(tbl != null)
        lblTotal.Text = tbl.Compute("SUM(ItemQty)", null).ToString();
    else
        lblTotal.Text = null;
}// Recalculate the footer total when bound
Protected Overrides Sub Bind()
' Get the data source from the parent
Dim tbl As DataTable = CType(Me.TemplateParent.DataSource, DataTable)
' If not null, compute the sum of the item quantity
If Not (tbl Is Nothing) Then
lblTotal.Text = tbl.Compute("SUM(ItemQty)", Nothing).ToString()
Else
lblTotal.Text = Nothing
End If
End SubFor a data list that contains editable information, the process requires a few more steps so that the total remains accurate as the information changes. The following is taken from the demo application which you can use as a working example. There may be other methods to accomplish this task but this one works quite well.
Two private member variables are added to the footer template to track the current data source. In the overridden Bind method, when the data source changes, event handlers are connected to its ListChanged, RowChanged and RowDeleted events. The event handlers for those three events compute the total when they are called. The ListChanged handler could be used to recompute the total for changes and deletes as well but it is called frequently and multiple times even for a single change so the RowChanged and RowDeleted events are more efficient in those two cases.
// Used to track the current data source for totaling
private IBindingList bl;
private DataTable tblItems;

// We still need to override this even if there are no bound controls.  It's
// also the place to hook up event handlers if creating such things as footer
// totals, etc.
protected override void Bind()
{
    // The demo uses a data set so we'll get a reference to the table through the list manager
    CurrencyManager cm = this.TemplateParent.ListManager;
    DataTable newSource = ((DataView)cm.List).Table;

    // Hook up the events on the data source to keep the total current
    if(newSource != tblItems)
    {
        // Disconnect from the old source if necessary
        if(tblItems != null)
        {
            bl.ListChanged -= DataSource_ListChanged;
            tblItems.RowChanged -= DataSource_RowChgDel;
            tblItems.RowDeleted -= DataSource_RowChgDel;
        }

        tblItems = newSource;

        if(tblItems != null)
        {
            // For the total, we'll sum it whenever a row is added, changed, or deleted
            bl = (IBindingList)cm.List;
            bl.ListChanged += DataSource_ListChanged;
            tblItems.RowChanged += DataSource_RowChgDel;
            tblItems.RowDeleted += DataSource_RowChgDel;

            // Show the initial total
            lblTotal.Text = tblItems.Compute("Sum(SumValue)", null).ToString();
        }
        else
            lblTotal.Text = null;
    }
}

// Update the total when a row is added
private void DataSource_ListChanged(object sender, ListChangedEventArgs e)
{
    if(e.ListChangedType == ListChangedType.ItemAdded)
        lblTotal.Text = tblItems.Compute("Sum(SumValue)", null).ToString();
}

// Update the total when a row is changed or deleted
private void DataSource_RowChgDel(object sender, DataRowChangeEventArgs e)
{
    lblTotal.Text = tblItems.Compute("Sum(SumValue)", null).ToString();
}' Used to track the current data source for totaling
Private bl As IBindingList
Private tblItems As DataTable
' We still need to override this even if there are no bound controls. It's
' also the place to hook up event handlers if creating such things as footer
' totals, etc.
Protected Overrides Sub Bind()
' The demo uses a data set so we'll get a reference to the table through the list manager
Dim cm As CurrencyManager = Me.TemplateParent.ListManager
Dim newSource As DataTable = CType(cm.List, DataView).Table
' Hook up the events on the data source to keep the total current
If Not newSource.Equals(tblItems) Then
' Disconnect from the old source if necessary
If Not (tblItems Is Nothing) Then
RemoveHandler bl.ListChanged, AddressOf DataSource_ListChanged
RemoveHandler tblItems.RowChanged, AddressOf DataSource_RowChgDel
RemoveHandler tblItems.RowDeleted, AddressOf DataSource_RowChgDel
End If
tblItems = newSource
If Not (tblItems Is Nothing) Then
' For the total, we'll sum it whenever a row is added, changed, or deleted
bl = CType(cm.List, IBindingList)
AddHandler bl.ListChanged, AddressOf DataSource_ListChanged
AddHandler tblItems.RowChanged, AddressOf DataSource_RowChgDel
AddHandler tblItems.RowDeleted, AddressOf DataSource_RowChgDel
' Show the initial total
lblTotal.Text = tblItems.Compute("Sum(SumValue)", Nothing).ToString()
Else
lblTotal.Text = Nothing
End If
End If
End Sub
' Update the total when a row is added
Private Sub DataSource_ListChanged(sender As Object, e As ListChangedEventArgs)
If e.ListChangedType = ListChangedType.ItemAdded Then
lblTotal.Text = tblItems.Compute("Sum(SumValue)", Nothing).ToString()
End If
End Sub
' Update the total when a row is changed or deleted
Private Sub DataSource_RowChgDel(sender As Object, e As DataRowChangeEventArgs)
lblTotal.Text = tblItems.Compute("Sum(SumValue)", Nothing).ToString()
End SubKnown Issues and Their Workarounds
A couple of issues have been discovered that require workarounds:
The Click event for buttons in a row template may fire even if validation fails in another row or container control keeping the focus in the other row or container control. This appears to be a bug in how the button control raises its click event after validation. The workaround is to add a check to see if the row template contains the focus as the first thing in the button's event handler. For example:
private void btnDelete_Click(object sender, System.EventArgs e)
{
    if(this.ContainsFocus)
        this.DeleteRow();
}Private Sub btnDelete_Click(sender As Object, e As System.EventArgs)
If Me.ContainsFocus Then
Me.DeleteRow()
End If
End SUbWhen using two or more DataList controls that display related information from the same data set (i.e. a master/detail view), you cannot edit the key fields that are used to relate the two data sources in the master's data source. The data binding behavior of .NET is such that when the keys are edited, it treats the change as a deletion and an insertion which causes a rebind in the related data list and this can result in problems when moving from one data list control to the other. The workaround is to add a temporary auto-increment key to the data sources and use that to relate the data. Since they are no longer used in the relationship, the real key fields can then be edited in the master data source. If you do not show or do not edit the relationship key fields then this is not a problem. Please request technical support if you require a more detailed example of how to accomplish this.
Common Problems
Here are some common problems and their solutions that you may run into when developing template controls for the data list. The .NET Framework tends to hide some exceptions caused by binding errors such that they cannot be caught by your application. In those cases, the DataList will dump diagnostic information to the debug output window in Visual Studio when your application is running under the control of the debugger. If you are experiencing behavior as noted below, check there to see if it shows the source of the problem.
Forgetting to override the InitializeTemplate method or not calling InitializeComponent when using deferred initialization. If you are using deferred initialization, be sure that you override the InitializeTemplate method and call the standard InitializeComponent method from it so that all of the controls are created and initialized.
Calling InitializeComponent from the constructor at runtime and from the InitializeTemplate override. This will create duplicate controls and it will appear as if data binding is not working as nothing shows up in the controls. If using deferred initialization, suppress the call to InitializeComponent in the constructor as shown earlier and call it from InitializeTemplate instead. If not using deferred initialization, call it from the constructor and make sure it is not being called again in the InitializeTemplate override.
Forgetting to specify the template type. If a header or footer does not show up or no rows appear, check to be sure that you specified the correct template type and assigned it to the data list's RowTemplate, HeaderTemplate, and/or FooterTemplate property.
Forgetting to override the Bind method. All template controls must override the Bind method even if there are no bound controls (i.e. header and footer templates). If a header or footer does not show up or no rows appear, check the debug output window in the debugger for a message similar to this one:
**** [dlAddresses]: Exception occurred in BindData (1): The TemplateControl.Bind
method must be overridden in derived type 'AddressRow'
The offending control name appears in brackets at the start of the message and the template type is given at the end of the message.
Forgetting to clear the data bindings. If you forget to clear the data bindings and a row template is re-bound, you will see an exception that states that binding to the given property would create a duplicate binding which is not allowed. Check to be sure that you have cleared the DataBindings collection on all controls in the template in the Bind method. This problem can be avoided by using the template control's overloaded AddBinding method.
General binding errors. These types of errors include forgetting to bind a control to a field in the row source, misspelling the property name or field name when creating the binding, or perhaps not including the field in the row source. Binding errors may generate an error message in the debug output window so always check there if you experience odd behavior but no exception is thrown. It will look similar to the following:
**** [dlAddresses]: Exception occurred in BindData (1): [exception details]The offending control name appears in brackets at the start of the message and the exception details follow at the end of the message. The details may be generic such as a null reference exception or more detailed such as telling you which binding failed.
When using a DataSet as the data source for the data list control, be sure to use fully qualified member names in any bindings in the header and footer controls. The header and footer controls are bound to the data source rather than an individual row and as such need the data member name specified in any data bindings.
C#// The demo uses a data set so we need to use the fully qualified field name for // the header control as it is bound to the data source as a whole. this.AddBinding(lblKey, "Text", "Addresses.ID");VB.NET' The demo uses a data set so we need to use the fully qualified field name for ' the header control as it is bound to the data source as a whole. Me.AddBinding(lblKey, "Text", "Addresses.ID")Accidentally binding two controls to the same field in the row source. This problem will not usually generate any exceptions but may cause unexpected behavior such as one control assuming the value of another control when you make changes in the first control or a control losing its value when it loses the focus. Check the data bindings in the Bind method to ensure that they are binding to the correct fields and the correct properties in each control.
Not setting a unique binding context on controls that share a common data source within the same template. As noted earlier, each row template has its own binding context so controls in each one can share a common data source without conflicts (i.e. a combo box in each row can re-use a common data source for its items). However, as with any other form or user control, controls within the same template that share a common data source must have their own binding context. For example, if you have two combo boxes on a template that share the same data source for their items, assign a new binding context to the BindingContext property in one or both of the combo boxes so that each can be set independently of the other within the same row.
Setting a shared data source for the template's list controls after the template has been assigned to the data list control. If this occurs, the controls in the template (combo boxes, list boxes, etc), may not show any items or will generate a null reference exception. Be sure to set the shared data sources for such controls before assigning the template to the data list control. Also be sure to use the same key name so that the correct data source is retrieved from the data list's SharedDataSources property.
Forgetting to call CommitChanges before saving the data source. If you save your data source (i.e. call Update on a data adapter) but some changes are missing, it could be that the information has not yet made it into the data source. Be sure to call the CommitChanges method on the data list or check the HasChanges property to ensure that any pending edits are pushed into the data source.
Up/down controls such as NumericUpDown will not save their changes to the data source. There is a bug in the .NET up/down controls that causes them to not commit their changes when the Value property is bound to the data source and you use the text box portion of the control to edit the value. The workaround is to bind the up/down control's Text property to the data source instead.